
Selective Preservation of Tooth (SPoT) Technique
Overview:
Indicated in cases of non-restorable anterior and posterior teeth indicated for Socket Shield procedure.
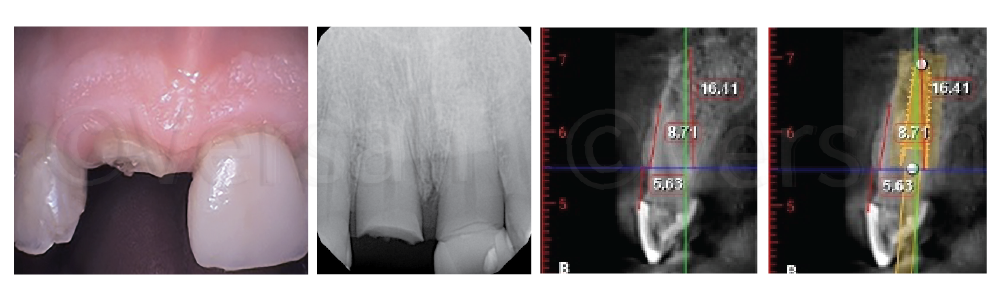
Diagnostics:
Establish hard and soft tissue measurement and landmarks using clinical and radiographic imaging.
1: Measure distance of gingiva to bone crest (soft tissue depth to crest)
2: Measure bone crest to apex/root length in bone (amount of shield length in bone)
3: Measure the amount of bone available for implant placement (alveolar bone width and length)
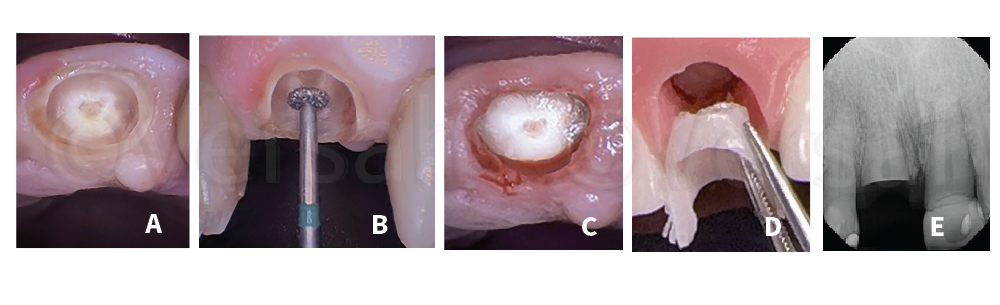
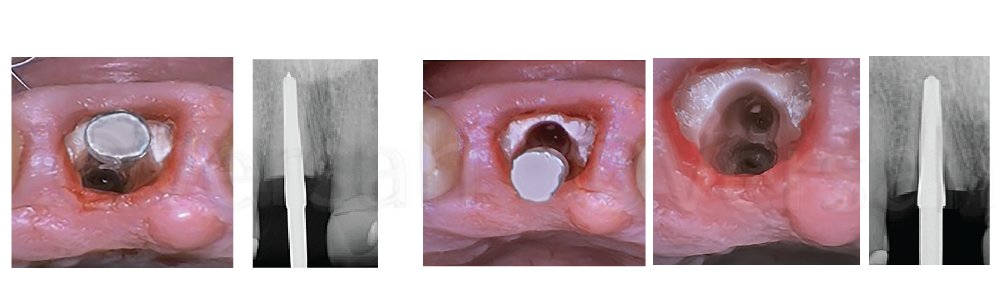
Step 1: Hollow out Tooth Center
1: Use a high-speed round diamond bur 3mm in diameter Meisinger -801H 029 to reduce the center of the root 2-3 mm sub-gingival leaving approximately a 1 mm shell of the tooth around the periphery (as in A).
Step 2: Establish Restorative Zone
1: Flatten tooth to bone level: Use a high-speed Meisinger 909 G flat diamond wheel bur from the center and move outward to flatten the root to palatal bone level (as in B and C). The goal is to create the Restorative-Zone emergence profile space (as in D).
2: Take a digital perio-apical radiograph to verify measurement from bone crest to apex (as in E).
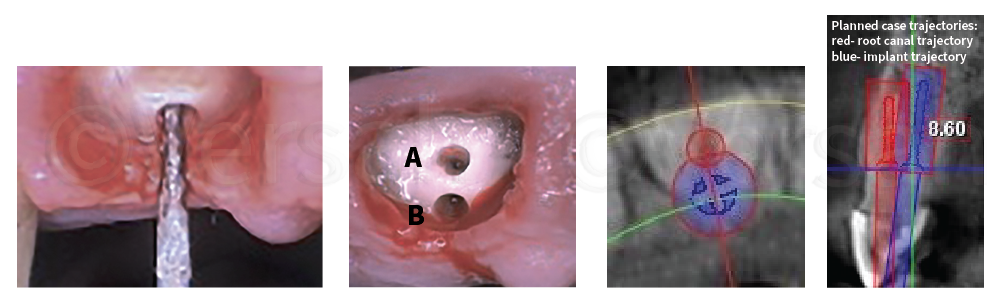
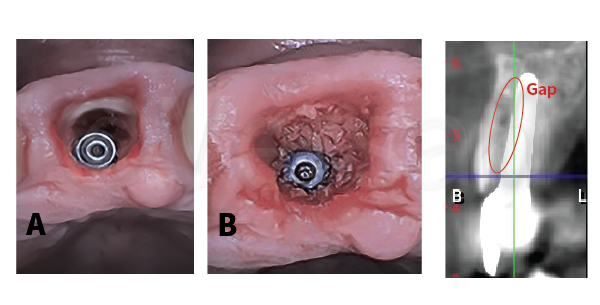
Step 3: Pilot Trajectories 1 or 2 Holes (depending on root anatomy)
1: Use a high-speed driven carbide bur Meisinger HM162SX 014 (7 mm cutting height) following the root canal trajectory and going 1 mm beyond the root apex to ensure all canal contents are removed (this will be pilot A). Verify root canal filling removal with a radiograph.
2: Use the same bur to establish implant site trajectory at similar depth (this will be pilot B).
3: Both pilot holes should be approximately 1-2 mm in diameter.
Step 4A: Widen Apex Removal Hole
Use Densah® Burs (2.0 and/or 2.3) consequently 1000-1300 RPM in clockwise (CW) mode with adequate irrigation following the root canal trajectory 2 mm beyond the apex to ensure complete apex removal. Verify with PA radiograph.
Step 4B: Widen Implant Osteotomy Trajectories
1: Use the Densah® Burs (2.0 and 2.3) in clockwise mode with adequate irrigation, in the implant site to a depth that is 1 mm deeper than the planned implant length. Verify with PA radiograph.
2: Use Densah® Bur (3.0) in counterclockwise (CCW) with adequate irrigation to autograft for implant site.
Step 5A: Prepare Shield
1: Verify Shield Height: Use a level shaping bur Megagen Bur - 3DD50 to reduce the shield height to be 3mm subgingival in the buccal (as in A and B).
Step 5B: Mesial-Distal Root Split
1: Use a high-speed long shank tapered bur diamond or carbide Meisinger HM34IL 012 (as in C) to section the shield in mesial-distal direction and remove a palatal root section.

Step 5C: Final Shield Preparation
1: Use a high-speed round diamond or other designated shaping bur to reduce the coronal shield thickness to 1-2mm (as in A). Megagen Bur - 2DD304
2: Create Shield Chamfer preparation (as in B). Megagen Bur - GD40G
3: Depending upon the implant type and diameter, develop the implant site further with the Densah® Bur according to Versah’s Implant System Drilling Protocol. (as in C) (versah.com/implant-system-drilling-protocols/)

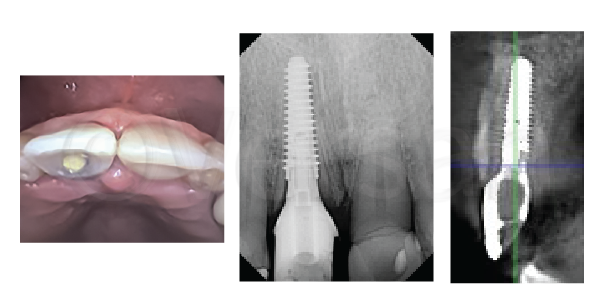
Step 6:
1: Place the implant into the Osseodensified site (as in A).
2: Fill the jump-gap between the implant and the S-Shape shield with either allograft or autogenous bone (as in B).
Step 7:
Fabricate an immediate screwed retained provisional crown or a custom-made provisional abutment.
Case courtesy of Charles Schwimer, DMD
Clinician judgement and experience should be applied in conjunction with this clinical practice suggestive use protocol.
10524 REV03 updated: 03/2026