


Ridge Expansion Protocol
Overview:
Osseodensification will not create the tissue, it may only optimize and preserve what already exists. There is a need for ≥ 2 mm of trabecular-bone core and ≥ 1/1 trabecular/cortical bone ratio to achieve a predictable plastic expansion. The more cortical bone there is, the more trabecular core is needed to facilitate predictable expansion. The ideal minimum ridge to expand is 4 mm (2 mm trabecular core + 1 mm cortex on each side). This protocol is indicated to expand a ridge with a narrow crest and wider base. It is not indicated in resorbed ridge with a narrow base.
• Diagnose and assess the amount of the trabecular bone using a CBCT
• Create intra-bony trough in narrow ridge < 4 mm
• No need for vertical side cuts
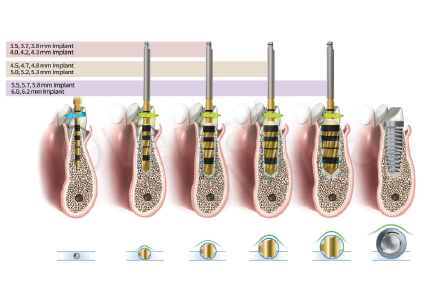
• Use Densah® Burs in small increments
• Over-size the osteotomy to be ≥ implant major diameter
• Osteotomy 1 mm deeper than implant length especially in the mandible
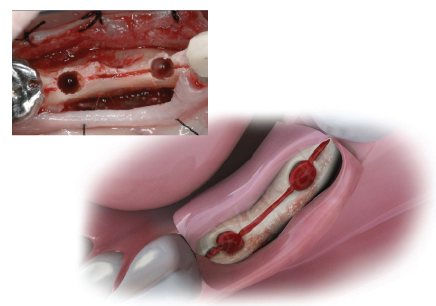
• Perform hard & soft tissue veneer contour graft to develop tissue thickness around implants

Diagnose & assess the amount of the trabecular bone available using a CBCT to evaluate the bone composition needed to perform a predictable plastic expansion. Flap the soft tissue using instruments and technique normally used.
Step 1:
Create intra-bony trough in narrow ridge < 4 mm.
If the ridge contains ≤ 2 mm of trabecular-bone core or high cortical bone ratio, an intrabony ridge-split is needed; ridge-split to be made by a Piezosurgery 0.3 - 0.5 mm tip. Ridge-split is recommended to be as deep as the planned implant length. No vertical side cuts are needed. The ridge-split is to allow more buccal wall elasticity during the expansion procedure. This intra-bony split is contra-indicated in resorbed ridge with a narrow base.

Step 2a:
Use the Densah® Bur in small increments, depending upon the implant type and diameter. After a narrow pilot osteotomy, change the surgical motor to Densifying Mode (counterclockwise, drill speed 800–1500 rpm with copious irrigation).
Start with the narrowest Densah® Bur in Densifying Mode until reaching the desired depth. Introduce the running bur into the osteotomy, feel the haptic feedback, lift off and reapply pressure with a pumping motion until depth is reached.
As bur diameter increases, the bone expands to the final planned diameter. Osteotomy may expand with minimal bone dehiscence, allowing implant placement in autogenous bone without thread exposure.
Step 2b:
Use the Densah® Bur in small increments, depending upon the implant type and diameter. After a narrow pilot osteotomy, change the surgical motor to Densifying Mode (counterclockwise, drill speed 800–1500 rpm with copious irrigation).
Start with the narrowest Densah® Bur in Densifying Mode until reaching the desired depth (same pumping technique as Step 2a). As bur diameter increases, the bone expands to the final diameter.

Step 3:
Oversize the osteotomy to be slightly wider than the implant major diameter (especially in the mandible) to prevent implant threads from over-straining expanded walls.
Mandibular osteotomies must be planned and performed 1 mm deeper than implant length.
Step 4:
Place an implant with a diameter equal or slightly larger than the initial ridge width. If using the surgical motor to tap the implant into place, the unit may stop when reaching the placement torque maximum. Finish placing the implant to depth manually with a torque indicating wrench.

Step 5:
Perform hard and soft tissue veneer contour-graft
to augment around the implant to develop tissue thickness that may enhance long term stability.


Data on file, visit versah.com/our-science/ for Ridge Expansion studies
** Clinician judgement and experience should be applied in conjunction with this clinical practice suggestive use protocol
10516 REV03 5/2023